Section 3
ALIGNMENT PROCEDURE #3
Alignment: Align the VCO as per instructions in general alignment procedure.

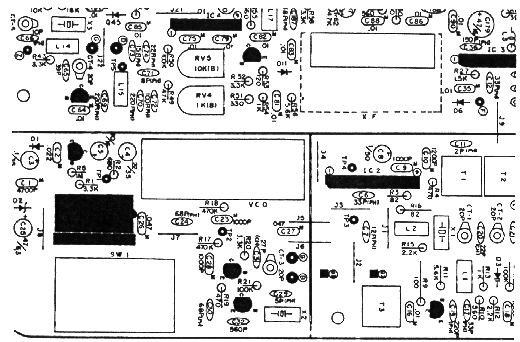
Fig. 26 - Parts Location 02A Chassis
Offset Alignment:
Clarifier - centered Mode - USB
1. 10.0525 MHz Frequency
Alignment
Connect both oscilloscope and frequency counter to the test point TP3
and adjust the core of T3 maximum amplitude of scope display (10.0525
MHz x 2), then adjust the trimming capacitor CT1 to obtain the reading
of: 20.105 MHz ± 40 Hz.
Next, place the mode switch in the LSB position and adjust CT2 to obtain
the reading of: 20.1035 MHz ±40 Hz.
NOTE: It X 1 is changed, C20 and C21 must be removed.
Use this procedure
if X1 has been changed to 9.87 MHz.
2. 9.87 MHz Frequency Alignment Mode: USB
Connect both oscilloscope and frequency counter to the test point TP3
and adjust the core of T3 maximum amplitude of scope display (9.87 MHz
x 2), then adjust the trimming capacitor CT1 to obtain the reading of:
19.7450 MHz ± 40 Hz.
Next, place the mode switch in the LSB position and adjust CT2 to obtain
the reading of: 19.7435 MHz ±40 Hz.
Use this procedure
if X1 has been changed to 10.000 MHz.
3. 10.000 MHz Frequency Alignment Mode: USB
Connect both oscilloscope and frequency counter to the test point TP3
and adjust the core of T3 maximum amplitude of scope display (10.0025
MHz x 2), then adjust the trimming capacitor CT1 to obtain the reading
of: 20.005 MHz ± 40 Hz.
Next, place the mode switch in the LSB position and adjust CT2 to obtain
the reading of: 20.0035 MHz ±40 Hz.
4.10.695 MHz Frequency
Alignment
Connect the frequency counter to TP5 and adjust CT5 to read 10.695 MHz
in the USB mode of operation. Next, place the mode switch in LSB and adjust
CT4 to read: 10.692 MHz ±50 Hz.
This completes the alignment procedure. The receiver is ready for operation.